Pages

Friday, October 31, 2014

Mexican Beef Taco and Cornbread Pie


Yield: 6 servings


I was in the 
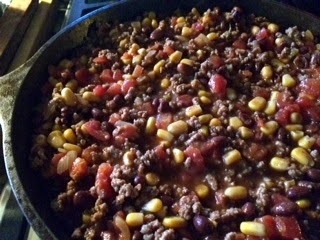
mood for tacos, but wanted to try something a bit different.  This is an easy, comfort supper that will give you a “taco fix”!  What could be better than layers of beef, beans, and corn topped with a green chili and cheese cornbread?  It’s sort of like a Mexican shepherd’s pie.  I used my 12-inch cast iron skillet for a truly one pot meal.

Ingredients
·        1 pound ground beef
·        2 Tablespoons extra-virgin olive oil
·        1 medium onion, chopped
·        1 package taco seasoning (I only used ½ the packet)
·        1 (15-oz) can diced tomatoes with green chilis, drained
·        1 (15-oz.) can chili seasoned black beans, undrained
·        1 (15-oz) corn niblets, drained  
·         1 package cornbread mix, plus ingredients to prepare as directed (I used Fleishmann’s Simply Homemade Cornbread mix)
·        1 cup shredded Mexican cheese
·        1 (4-ounce) can diced green chilis

Directions
1.     Preheat oven to 350°F.  Add olive oil to your cast iron skillet OR lightly grease or spray an 8-inch square baking dish with nonstick cooking spray.
2.    Place your large skillet over medium heat and add onions and ground beef.  Cook until beef is well browned.  Stir in taco seasoning, diced tomatoes, beans, and corn. Cook for 5 minutes on low until thickened.  (If you’re using a separate baking dish, transfer mixture to prepared baking dish, spreading it in an even layer.)
3.    Prepare cornbread batter according to package directions, stirring in cheddar cheese and green chilis until just combined. Spread batter over beef mixture, smoothing to edges of dish. Bake, uncovered, for 30 to 35 minutes or until cornbread is golden brown and tests done with a toothpick. Serve with sour cream, salsa, shredded cheese, black olives, diced tomatoes, diced avocado, or guacamole.

 Notes:  You can adjust the spiciness to your taste; I used mild taco seasoning and mild chili beans. You can use your own home made cornbread or a mix; Fleishmann's has a new cornbread mix and it's excellent.


Thursday, October 30, 2014

Italian Roasted Red Pepper and Tomato Soup, Slow Cooker Style


Serves 10 -12


Returning from the farmer’s market with a bushel of the last of this year’s tomatoes, I put my beloved slow cooker to work to make this healthy and “skinny” soup!  The combination of vine ripened tomatoes and roasted red peppers are the perfect complement to my grilled Gouda cheese sandwich (perhaps this sandwich isn't so "skinny")! This soup is the essence of the end of summer and the beginning of Autumn and is indeed beautiful as well as tasty! 

INGREDIENTS:

8 large tomatoes, peeled, seeded and coarsely chopped
2 15-ounce cans diced tomatoes, undrained
Handful of chopped baby carrots (optional)
1 24-ounce jar roasted red peppers, undrained
1 can low sodium chicken broth
1 Tablespoon Italian seasoning
2 cloves garlic, minced
1 Tablespoon extra-virgin olive oil
½ teaspoon ground black pepper (or to taste)
½ teaspoon salt (or to taste)
 1 teaspoon sugar (I used 1 packet of Splenda)
1 5-ounce can evaporated milk
Shaved Parmesan cheese for garnish

DIRECTIONS:

Place all ingredients except for evaporated milk into slow cooker.  Cook on low for 5 to 6 hours.  Add evaporated milk during the last half hour or so of cooking.

Use an immersion blender to puree to desired consistency; I like to leave a few veggie chunks in my soup for texture and body. 

Serve in bowls and top with shaved Parmesan cheese. 

Wednesday, October 29, 2014

Yummilicious Salted Caramel Sauce


  Makes 2 cups


I am in love with salted caramel!  It was love at first taste (bite?) when I sampled a cup of salted caramel hot chocolate in a Williams Sonoma store a couple of years ago.  If you love caramel, then you will love this.  If you love chocolate AND caramel, then this makes the perfect topping for brownies or ice cream!  If you love apples, this makes the perfect topping or dipping sauce for fresh, crisp apples.

I found this to be a bit labor intensive, but it’s well worth the effort.  I don't have a candy thermometer (yet!), so I just eyeballed the color of the sauce and it turned out perfectly.  It required more time and stirring that I had anticipated so my stirring arm got quite a work-out!  Verdict?  I LOVE this sauce!  I could eat a jar of it by the spoonful... but I won't.  I'll save this decadence for brownies, pies, apples, and such.  I am one happy girl.

INGREDIENTS:
2 cups granulated sugar
12 Tablespoons unsalted butter, cut into pieces
1 cup heavy cream, at room temperature
1 Tablespoon Kosher salt

DIRECTIONS:
1.  Be sure that your ingredients are ready because your close attention is required to make the sauce so that you don’t burn it.  Heat the sugar over medium high heat in a heavy, non-stick, 2 to 3 quart sauce pan, with deep sides.  When the sugar begins to melt, whisk or stir the sugar with a wooden spoon.  You will see that it begins to clump together, but continue to stir.  It will continue to melt and break down into a liquid.

2.  Continue to cook the sugar until it reaches a deep amber color, sort of like the color of maple syrup.  Continue to stir and don’t take your eyes off the pan!  You can use the whisk to get rid of any remaining clumps.  Be sure to watch carefully as you don’t want the caramel to burn.  Ideally, the caramel should reach 350 degrees F. 

3.  Once the sugar turns to the dark amber color, very carefully add the butter, a few chunks at a time.  Whisk or stir with a wooden spoon until the butter is melted.

4.  Remove the pan from the heat and very slowly pour in the heavy cream, stirring until the cream is well blended and the caramel is smooth.  Stir in the Kosher salt.

5.  Cool the sauce to room temperature before pouring it into jars. 

6. Store the sauce in the refrigerator and warm up a bit to drizzle.  It will be good for about a month.

Notes:  Be sure to use Kosher salt and not table salt; it makes a difference.  I found that 1 Tablespoon salt worked well... you can adjust more or less to  your taste.